
Setting up a SPFx development environment looks simple on paper, but in reality, it is one of the most frequent sources of delays and configuration issues in SharePoint projects.
This guide is based on my own experience setting up SPFx development environments. I initially struggled with the installation process, which is why I decided to document a clear and practical setup path.
This post is a complete SPFx development environment setup guide, walking you through every step from installing Node.js to loading your first web part in the browser.
SharePoint Framework (SPFx) is today the standard way to build client-side customizations for SharePoint Online. Before writing a single line of code, your machine needs to be properly configured. This post walks you through every step, from installing Node.js to loading your first web part in the browser.
A quick word on SharePoint on-premises vs. online
If you are still working exclusively with SharePoint on-premises, be aware that SPFx support there stopped at an early version of Node.js. For greenfield projects or any modern development work, I strongly recommend targeting SharePoint Online.
As for the historical context: we have come a long way from farm solutions, sandbox solutions and provider-hosted apps. SPFx replaced all of that JavaScript injection chaos with a clean, supported, component-based model. It is the right tool for the job today in your SharePoint 365 tenant.
If you are still unsure which path to take, check out my dedicated guide SharePoint Online or On-Premises?
I personally faced several difficulties during the initial setup of SPFx environments.
Even basic configuration steps were not always straightforward and I spent significant time resolving environment issues before being able to successfully run my first project.
Let’s start with the prerequisites.
Step 1, setup Node.js for your SPFx development environment setup
SPFx is notoriously sensitive to Node.js versions. Rather than installing Node directly and fighting version conflicts later, use NVM (Node Version Manager) from day one.
Installing NVM on Windows
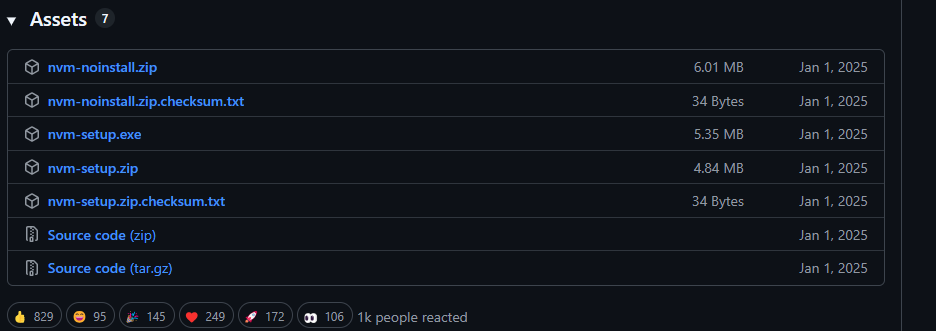
The easiest approach on Windows is the installer provided by the community project nvm-windows. Scroll down to the Assets section and download nvm-setup.exe, then follow the installer to completion.
Note: After installation, close all open PowerShell windows and Command Prompts before continuing. NVM won’t be recognized until you open a fresh terminal.
Switching to the right node version
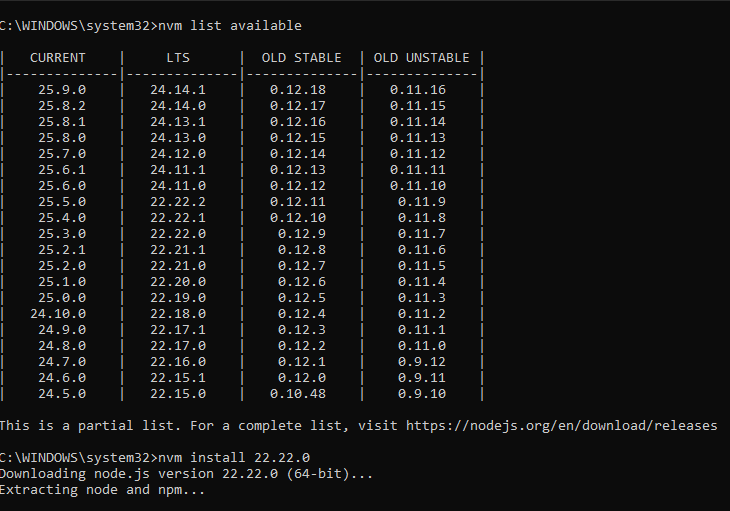
Open a new Command Prompt and run:
nvm use 22.22.0
If you haven’t installed that version yet, NVM will prompt you and you need to run nvm install 22.22.0 first.
Step 2, Install the SPFx development environment setup toolchain
The SPFx toolchain has also evolved significantly over time.
Earlier versions relied heavily on Gulp as the main build system.
Modern SPFx projects now use Heft, which introduces a different build approach and additional configuration complexity.
This transition can create challenges when maintaining or migrating older solutions.
The following steps are a condensed version of the official Microsoft documentation. With Node.js active, install the three core tools in one command:
npm install @rushstack/heft yo @microsoft/generator-sharepoint --global
This installs:
- Heft, the build system that replaced Gulp in modern SPFx.
- Yo (Yeoman), the scaffolding engine.
- Yeoman SharePoint Generator, the SPFx-specific scaffolding templates.
If npm prints a warning suggesting you update itself, go ahead:
npm install -g npm@11.12.1
Step 3, Configure your tenant domain
SPFx needs to know which SharePoint tenant to target when serving your web part locally. You have two options.
Option 1, System environment variable
Add a new System environment variable via the Windows GUI:
- Variable name:
SPFX_SERVE_TENANT_DOMAIN - Variable value:
yourtenant.sharepoint.com
After saving, restart your terminal for the change to take effect.
I also tried setting up the environment variables using CMD and PowerShell, but it did not work for me, which led me to adjust the configuration manually.
Option 2, Edit serve.json
This approach is project-scoped, requires no environment setup on a colleague’s machine and works cleanly in CI environments. Once you have a project folder (see Step 4), open config/serve.json and set the initialPage URL to point to your tenant: replace {tenantDomain} with the correct tenant URL. Configure it once and forget it.
Choose the option that fits your situation: if you work across multiple tenants, Option 2 is more flexible. If you work exclusively with your company tenant, Option 1 is better.
Step 4, Scaffold your project
Navigate to your project folder (or create one) and install dependencies:
cd your-project-folder
npm install
If you are starting from scratch, generate a new project with the Yeoman generator:
yo @microsoft/sharepoint
Follow the prompts to choose your component type, framework and other options.
Step 5, Trust the developer certificate
SPFx serves your code over HTTPS locally. You need to trust the self-signed certificate once per machine:
heft trust-dev-cert
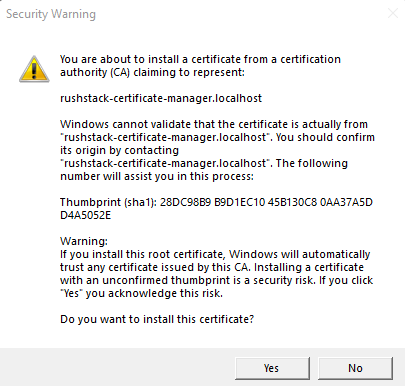
Click Yes.
Step 6, Run the local server
Start the development server:
heft start
Wait for the build to complete. A browser window will open automatically and you will likely see this message :
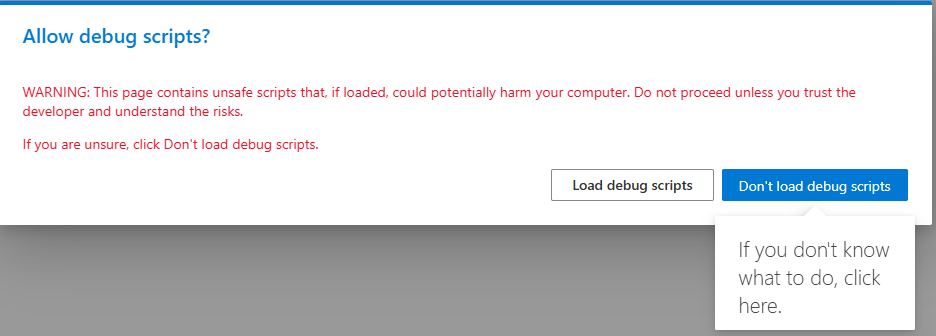
I click Load debug scripts. Then click the + button to add a web part to the page and select yours from the list. A few seconds later, your component loads live in the browser, connected to your real SharePoint tenant, served from your local machine.
In my case, I selected Fluent SP Navigator

Hello FluentSP Navigator
Congratulation!
Our SPFx development environment setup is ready.
Summary of our SPFx development environment setup
| Step | Command / Action |
|---|---|
| Install NVM | Download nvm-setup.exe from GitHub |
| Activate Node | nvm use 22.22.0 |
| Install toolchain | npm install @rushstack/heft yo @microsoft/generator-sharepoint --global |
| Configure tenant | Set environment variable SPFX_SERVE_TENANT_DOMAIN or serve.json |
| Scaffold project | yo @microsoft/sharepoint |
| Trust certificate | heft trust-dev-cert |
| Start dev server | heft start |
Setting up SPFx environments is not just a technical step; it is a critical foundation for successful SharePoint development projects.
Poor configuration at this stage often leads to long-term instability and delays in delivery.